
Do you get confused between what is Git and GitHub 😨?
Looking to get started git? Have you recently discovered that you pretty much need to be on GitHub if you want anyone to take you seriously in tech?


This one’s for you!
An Intro to Git and GitHub😉🙃..
It’s totally easy to get started with Git. If you’re a fast reader (and you don’t take a lot of time with sign-up and installation), you can be up and running on GitHub about ten minutes from right now.
GitHub is undoubtedly one of the most popular platforms for code hosting and collaboration.
Most developers use standard features such as repository creation, code review, etc. But there are various underrated features that you can use to unlock GitHub’s full potential.
For example, use the repository template feature, see repository metrics and learn handy shortcuts.
In this tutorial, I’ll introduce some lesser-known but powerful GitHub features. Hopefully, these tips and tricks will make your work more efficient.
Let’s get started!

1. What Is Git? 🤔
Git is a free and open source distributed version control system.
What is version control? Essentially, it’s a system that allows you to record changes to files over time, thus, you can view specific versions of those files later on.
2. Why Use Git? 🙄
Over time, Git has become an industry standard for development. Being able to snapshot your code at a specific time is incredibly helpful as your codebase grows and you have to reference previous versions of it.
3. How It Works 😯
With Git, you record local changes to your code using a command-line tool, called the “Git Shell” (you can use Git in other command-line tools — I’ll refer to Git Shell through the following sections). Command-line lets you enter commands to view, change, and manage files and folders in a simple terminal, instead of using a graphical user interface (GUI).
If you have not used the command line before, don’t worry, once you get started, it is incredibly straightforward.
I’ll also show you some terminal commands that you might want to use to make your life just a little bit nicer.
Git Bash
At its core, Git is a set of command-line utility programs that are designed to execute on a Unix-style command-line environment.
Modern operating systems like Linux and macOS both include built-in Unix command line terminals. This makes Linux and macOS complementary operating systems when working with Git.
In Windows environments, Git has often been packaged as part of higher-level GUI applications. GUIs for Git may attempt to abstract and hide the underlying version control system primitives.
How to navigate folders 🤔
- pwd
is used to print the 'present working directory'.
pwdis equivalent to executing cd on a DOS(Windows console host) terminal. This is the folder or path that the current Bash session resides in.
- ls
lsis used to 'list' contents of the current working directory "folder".lsis equivalent toDIRon a Windows console host terminal.
- cd [directory-name]
Both Bash and Windows console host have a cd command.
cd is an acronym for 'Change Directory.
cd is invoked with an appended directory name.
Executing cd will change the terminal session's current working directory to the passed directory argument.

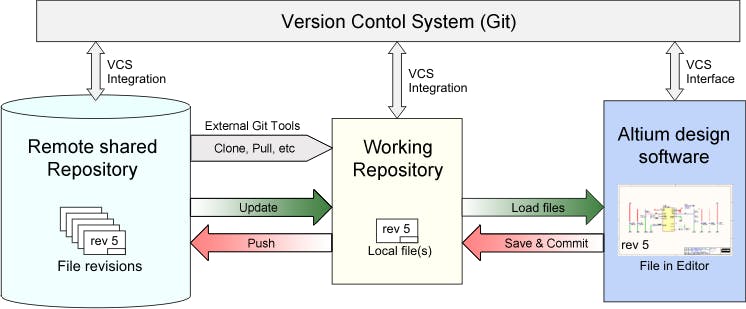
What is a Git Repository?
A Git repository tracks and saves the history of all changes made to the files in a Git project. It saves this data in a directory called
.git, also known as the repository folder.Git uses a version control system to track all changes made to the project and save them in the repository.
Users can then delete or copy existing repositories or create new ones for ongoing projects.
Types of Git Repository
1. Bare Repositories
Software development teams use bare repositories to share changes made by team members. Individual users aren't allowed to modify or create new versions of the repository.
2.Non-bare Repositories
With non-bare repositories, users can modify the existing repository and create new versions. By default, the cloning process creates a non-bare repository.
How to Get a Git Repository🤨🧐
There are two ways of obtaining a Git repository:
Turning an existing directory into a Git repository (initializing).
Cloning a Git repository from an existing project.
10 Git Commands Every Developer Should Know 👌👌..
Since there are many various commands you can use, mastering Git takes time. But some commands are used more frequently (some daily). So in this post, I will share and explain the 10 most used Git commands that every developer should know.
1. Git clone
Git clone makes an identical copy of the latest version of a project in a repository and saves it to your computer.
The original repository can be located on the local filesystem or remote machine accessible supported protocols.
The git clone command copies an existing Git repository.

Use the
git clonecommand to clone an existing repository and copy it to your system:git clone [url] [directory]Where:
[url]: The URL of the Git repository you want to clone.[directory]: The name of the directory you want to clone the repository into.
The example below demonstrates how to obtain a local copy of a central repository stored on a server accessible at
example.comusing the HTTP username anjum:git clone http://anjum@example.com/path/to/my-project.git cd my-project
2. Git branch
When using Git, you can view the version history of your project’s development. However, sometimes you may choose to develop features, fix bugs, or experiment in ways where you want to separate your main project’s code from another variant.
We can use the git branch command for creating, listing and deleting branches.
To push the new branch into the remote repository, you need to use the following command:
I.Creating a new branch
the git branch command can be used to create a new branchWhen you want to start a new feature, you create a new branch off main using git branch new_branch.
git branch <branch-name>
ii. Viewing branches
To see local branches, run this command:
git branch or git branch --list
To see remote branches, run this command:
git branch -rTo see all local and remote branches, run this command:
git branch -a
iii. Deleting a branch
The command to delete a local git branch can take one of two forms:
git branch –delete old-branchgit branch -d old-branch
The only difference is the fact that the second local branch deletes the Git command using an abbreviated syntax. Both commands do the same thing.
3. Git checkout
The
git checkoutthe command operates upon three distinct entities:files, commits, and branches.
In addition to the definition of "checkout" the phrase "checking out" is commonly used to imply the act of executing the
git checkoutcommand.
git checkout <branchname>
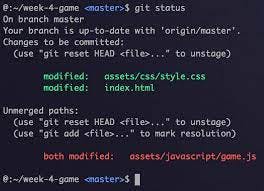
4. Git status
The Git status command gives us all the necessary information about the current branch.
git status
We can gather information like:
Whether the current branch is up to date
Whether there is anything to commit, push or pull
Whether there are files staged, unstaged or untracked
Whether there are files created, modified or deleted
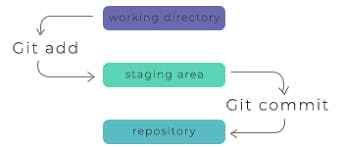
5. Git add
- The git add command adds a change in the working directory to the
staging area. It tells Git that you want to include updates to a particular file in the next commit. However, git add doesn't affect the repository in any significant way—changes are not actually recorded until you run git commit.
Common options
Stage all changes in
<file>for the next commit.git add <file>Stage all changes in
<directory>for the next commit.git add <directory>Begin an interactive staging session that lets you choose portions of a file to add to the next commit.
git add -p
Time for a Break!!

6. Git commit
Let's continue with the topic!!

The git commit command captures a snapshot of the project's currently staged changes. Committed snapshots can be thought of as “safe” versions of a project—Git will never change them unless you explicitly ask it to.
This is maybe the most-used command of Git. Once we reach a certain point in development, we want to save our changes (maybe after a specific task or issue).
Common options
Commit the staged snapshot.
git commitCommit a snapshot of all changes in the working directory.
git commit -aA shortcut command that immediately creates a commit with a passed commit message.
git commit -m "commit message"A power user shortcut command that combines the
-aand-moptionsgit commit -am "commit message"This option adds another level of functionality to the commit command. Passing this option will modify the last commit. Instead of creating a new commit, staged changes will be added to the previous commit
git commit --amend
7. Git push
git pushis most commonly used to publish and upload local changes to a central repository. After a local repository has been modified a push is executed to share the modifications with remote team members.
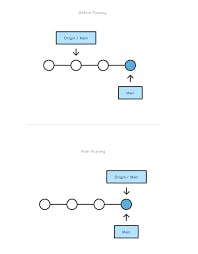
git push <remote> <branch-name>Important: Git push only uploads changes that are committed.

8. Git pull
he git pull command is used to get updates from the remote repo. This command is a combination of git fetch and git merge which means that, when we use git pull, it gets the updates from remote repository (git fetch) and immediately applies the latest changes in your local (git merge).
git pull <remote>

9. Git revert
The
git revertthe command can be considered an 'undo' type command, however, it is not a traditional undo operation. Instead of removing the commit from the project history, it figures out how to invert the changes introduced by the commit and appends a new commit with the resulting inverse content.This prevents Git from losing history, which is important for the integrity of your revision history and reliable collaboration.


Common options
This is a default option and doesn't need to be specified.
-e --editThis is the inverse of the
-eoption. The revert will not open the editor.--no-editPassing this option will prevent
git revertfrom creating a new commit that inverses the target commit. Instead of creating the new commit this option will add the inverse changes to the Staging Index and Working Directory.-n --no-commit

10. Git merge
The git merge command facilitates you to take the data created by the git branch and integrate them into a single branch. Git merge will associate a series of commits into one unified history. Generally, git merge is used to combine two branches.
When you've completed development in your branch and everything works fine, the final step is merging the branch with the parent branch (dev or master). This is done with the
git mergecommand.For example, when you want to merge your feature branch into the dev branch:
First, you should switch to the dev branch:
git checkout devBefore merging, you should update your local dev branch:
git fetchFinally, you can merge your feature branch into dev:
git merge <branch-name>
So these are 10 most-used git commands.
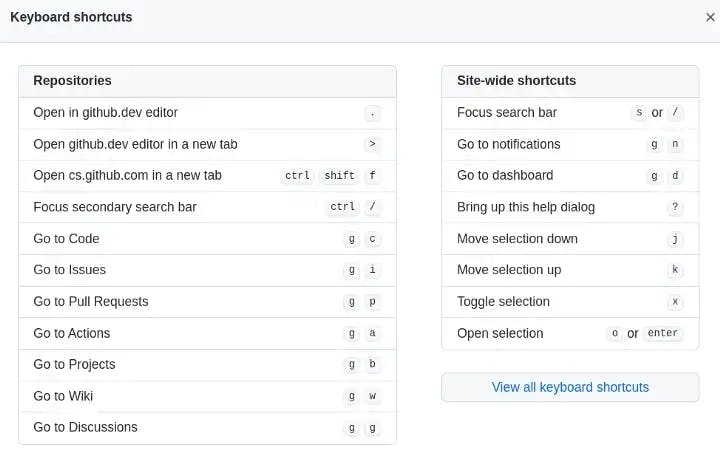
Useful Keyboard Shortcuts
Did you know that you can access all shortcuts in GitHub if you press the ? key on your keyboard?
Congratulations!!! You did it!
As always, if you do anything awesome with this information, I’d love to hear about it! Leave a message in the responses section or reach out any time on LinkedIn
Thanks for reading!
